Tuesday, December 7, 2010

christmas ice decorations


  If you are looking for something to help you look forward to cold freezing weather maybe this will help.   I have always wanted to try these and last year we finally did.  They were very easy and can be made with anything you have at home or in your yard.  Ice can be frozen into luminaries, wreaths, outside tree ornaments, or any other ideas you can think of.


Supplies you will need:
Any kind of pans, dishes, molds, or containers
Berries, greenery, pinecones, orange peel, nuts, etc.
Water and freezing temperatures or a freezer


Bundt pans work great because they already have the hole in the middle.  If not you can place a paper cup or a tin can in the middle of the container weighted with stones.   I placed mine just outside our back door over night.  When you are ready to take it out let it sit at room temperature for a few minutes and then soak the bottom of the pan in warm water for a few minutes.  Hang the wreath with a ribbon or place a votive candle in the middle for a festive center piece or a outside ice luminary.  

They can be very fancy and elegant but very inexpensive if not free.  This is my kind of decor.  We are excited to make them again this year. 

Friday, December 3, 2010

temple picture gifts

Need an idea for Christmas gifts? I made these for my neighbors for Christmas this year.  And the fun part about it is that you can hand it on your tree and then hand it somewhere else to enjoy all year long. I also made them for my kiddos you hand in their rooms.
All you need
one 5x7 picture of the temple
one 5x5 block
Mod Podge
Black paint
Brush
Ribbon
Drill

Start by cutting your picture into a 5x5 square. Paint your block and dry. Once the block is painted Mod Podge your picture on to one side of the block.  Now that your picture is on and dried. Drill holes for your ribbon and lace the ribbon through.

For temple pictures visit my Blog. http://www.hollievansphotography.blogspot.com/  or my Etsy store HolliCycle and you can order them in many sizes. If ordering multiples in the same size I will give you 10% discount

Wednesday, November 3, 2010

chicken wild rice soup

Here is one of or favorite cold weather soups.  A few people have asked me for the recipe and it has taken me a while, sorry everyone.  Those of you who know me know that I really only measure ingredients when I have to.  Sometimes this makes it hard to share a recipe because I am not sure of the exact measurement of all of the ingredients.  So last this time when I made this soup I was a little more careful to write it down.  So here it is.


The recipe I first tried called for cooked chicken and canned chicken broth but if I am going to cook the chicken I might as well make chicken broth as well right. So here is what I start with in my crock-pot.  

Chicken Broth and Chicken:
2-3 chicken breasts
2-3 carrots chopped
1 small onion chopped
1 tsp salt
few shakes of pepper (is that a measurement?)
1/2 tsp celery salt
(I don't always have celery but if you have it use 1-2 stalks and add a little more salt)
1/2 Tb Parsley
I then fill my crock-pot full with water about 8 cups.
Cook this on high for 4-6 hrs or low 8-10hrs.

Sometimes I use dehydrated carrots and onions in the chicken broth instead.  Whatever you have on hand will work.  When the chicken is done scoop out chicken to a cutting board and then strain the broth.  This will make more that what you need for the soup.  I put my extra in a glass jar and put it in the fridge for a later dinner in the week or freeze it in ice cubes trays for longer storage.

For the soup:

Cook 2 boxes of Uncle Ben's Long Grain and Wild Rice (original)  with seasoning according to package directions.
When done add about 3 cups of chicken broth and cubed cooked chicken.
You may also add some the diced carrots or celery from your broth if you like.
Add 1/2 cup of cream (this is a key ingredient) and about 1/2 cup milk.  You can adjust the milk to more or less depending on the consistency you would like.

The recipe really is pretty simple.  If you want to use canned chicken broth and use some other type of cooked chicken that would work also.  Hope you like it!!


Thursday, October 28, 2010

picture blocks

Here is a fun halloween decorations that is personal to your family and pretty inexpensive.  I have seen a lot of these pictures blocks so we decided to try it.  I edited my photos and put the text letter on the photo in Picasa from Google.  It is a free software download that I use a lot.  I am sure there are many other photo editing software programs that would do something similar.  I then had the pictures printed just in regular 4x6 size.  I then cropped the photos a little more to create different heights and to slim them down to fit on the blocks.  
I then cut a scrap piece of 2x4 into the sizes I needed for the photos.  I then sanded and painted the blocks.  Next I put some modge podge on the blocks, stuck the photos on, and then put a top layer of modge podge over the photo.  Last I sanded the edges a little.  This could be made for any holiday.  Happy Halloween!!

Wednesday, October 13, 2010

fun fall leaf pictures

We made these a few days ago and our little girls loved them and it gave us something fun to hang up showing the changing leaves.  First we went on a little walk and everyone collected leaves, fall flowers, seeds, or small twigs. We brought them home, laid them out on the table and everyone started creating.  We found that it works best if you start to draw your creation and then put a dab of glue on the paper and then stick the leaves, flower petals, or twigs on the paper.  You can them finish drawing details if you would like.  Simple and really fun!


Saturday, October 9, 2010

baked potato soup


I grew up in Idaho where fall means the fields are full of busy harvesters digging huge potatoes.  There are all sorts of great ways to eat them, but this is one of my favorites.  It is simple and easy and so good on a cool fall day.


Baked Potato Soup
Bake 4 large potatoes in the oven for 1 hour. 

To make the soup:

1/4 cup butter
1/4 cup flour
Melt the butter in a large pot and then add the flour.  Cook and stir for one minute and then add:
6 cups milk
Continue to stir and simmer over low heat until thickened but do not boil.  Then add:
1 tsp. salt
1/4 tsp. pepper
4 large baked potatoes, peeled and cubed
4 green onions, chopped   (or 2 tbsp. dried chives)

Serve topped with bacon, cheese, and/or sour cream.

Friday, October 8, 2010

pumpkin name settings

If you are in charge of Thanksgiving this year or want a fun get together with friends or family. This ideas is sure to get your guest talking.  This simple ideas was found at Better Homes and Garden. I love it because it is so simple and a fun gift for your guest to take home.

Tuesday, October 5, 2010

transform your pumpkin

What guest wouldn't love to serve themselves from this fun pumpkin punch bowl. Hollow out a pumpkin, scraping the side well to remove all the seeds and pulp before filling. Fill with cider and sliced apples. Serve in canning jars with a cinnamon stick.

This is such a fun way to serve chip at a fall get together with friends and family. So simple and so impressive that you will have your guest talking.
These are some of my favorite ideas to do with pumpkins that can use all season long. I found both ideas at Better Homes and Garden. They also have some more amazing ideas.
Now get creative we would love to see what you can do.


Wednesday, September 29, 2010

peanut butter frosting


Who doesn't love peanut butter cups? Well this is the next best thing. Peanut butter frosting. It is light and fluffy and good on brownies, cupcakes and my favorite a spoon. This frosting is simple and delicious. So lets get started!

You will need:
1 cup butter softened
1 cup peanut butter
1 tsp vanilla
whipping cream (or milk)
2 lbs of powder sugar (give or take)

Mix butter and peanut butter until smooth. Add vanilla and 1/3 of the powder sugar. Once it is mix well add a little cream and then a little sugar. Do this until you have used all the powder sugar and reached the constancy you desire. The longer and you beat it the fluffier it becomes especially when using cream. Turn your mixer down when adding powder sugar to keep it from flying everywhere.

So there you have it one of my favorite recipes using peanut butter. you can even add cocoa to the frosting to give it a chocolaty goodness. Have fun and spoil your family today with a yummy surprise.


Monday, September 27, 2010

peanut butter snack balls


These are some of our favorite lunch treats or after school snacks.  They are similar to peanut butter playdough and the peanut butter acorns but contain a few more ingredients and crunchy cereal.  I adapted this recipe from My Cafe Kitchen.  These are one of our favorite snacks because they are very yummy, easy to make,  and also packed with fiber and protein.  The recipe is flexible for whatever you have on hand.


1 cup honey
3 cups peanut butter (creamy or crunchy)
2 cups rice krispies
2/3 - 1/4 cup applesauce (optional - I have tried it with and without)
2 cups crushed cereal (I use Cheerios,  Life, or what every cereal I have on hand )
½ cup chocolate chips or dried fruit
3-4 tablespoons powdered milk
2 cups crushed mini-wheat cereal
Mix all of the ingredients but the last two until well combined.  Add powdered milk like flour until it forms a soft cookie like dough.
I use a small cookie scoop to make the balls and then roll them in crushed frosted mini wheat cereal or the crumbs from the bottom of the box. 


We put three in snack size baggies and put them in the freezer or fridge.


They are ready for lunches or afternoon snacks.  

Saturday, September 25, 2010

favorite kitchen chopper

 We love these little food choppers and have worn out a few different kinds at our house.  I decided to try this one after spotting it at IKEA.  Like many things from IKEA it is designed better than any other we have tried.

Here are the things I love about it:
1.  It is dishwasher safe, really.  (I have had others that said they were but then could not handle the heat.)

2.  It has a bigger top than most and is easier to push.


3.  The top comes off the container so that it can be filled from the top instead of the bottom.

 4.  The little container on the bottom has a lid that fits on the bottom when not is use and on the top to store any leftovers.
5.  By pressing down and turning, it becomes much shorter so that it will fit into more spaces.                        
                  
Over all it is one of my favorite kitchen gadgets to chop nuts, olives, onions, peppers, etc.
If you are looking for one, this is the best one out there.  Happy chopping.

Friday, September 24, 2010

peanut butter acorns

 In celebration of such a beautiful fall day or maybe just because it is Friday, a fun activity with my preschooler became today's great after school snack.  We used our favorite reciepe for peanut butter playdough to create these cute little edible acorns.
After rolling the dough into balls we dipped the top into melted chocolate, and chopped nuts, and finished them off with a little piece of pretzle.
 Fun, fast, easy, and healthy. 
 And a hit with the kids.  What more could a mom ask for.  Happy Fall!!

Thursday, September 23, 2010

eggplant parmesan

I love Italian food especially when it is made with fresh ingredients. This is one of my favorite dishes it is so light and yummy, made with my favorite things from my garden, tomatoes, eggplant, basil, and garlic. So lets get started.

You will need:
1 lg. eggplant (smaller ones work great for side dishes too.)
2 cloves of garlic
1 lg. tomato
olive oil
5 basil leaves
shredded Parmesan cheese

Start by washing and cutting your eggplant into half the log way. Scoop or cut out the inside of the eggplant leaving just the skin. Chop the eggplant that you removed from the skin into small cubes. Cut the tomato into small cubes and mince garlic as well. Set a side and preheat oven to 350*. In a small pan you are going to heat up about 4 tbs of olive oil and begin to saute your garlic for about 1 min just enough to season the oil. To the pan add your eggplant and season with salt and pepper to your liking. Cook the eggplant for 2 min and remove from heat. Add chopped tomatoes to the eggplant mixture and chopped basil as well. Scoop the eggplant mixture into the eggplant shell. Top with Parmesan and bake for 10-15min. until cheese is browned and eggplant is soft.

Enjoy!

Friday, September 17, 2010

lunch baggies

The perfect Eco-friendly container that's perfect for lunches or trips to the park.
To get started you will need. Fabric, Ripstop nylon, Ribbon, Velcro: fabric supplies.


1. Cut two rectangles of patterned fabric and ripstop nylon, each 13x7".

2. Pin right sides of fabric together, with nylon on the outside.

3. Fold two pieces of 5" ribbon in half and pin them, centered on each short side. The loop should be toward the inside and approximately 1 1/2" of the tails should be showing (so the tabs can be reinforced when you stitch the Velcro).

4. Stitch each short side using a 1/2" seam allowance.


5. Turn right side out and iron the fabric side on a warm setting.

6. Pin Velcro to each short end on the ripstop nylon side, approximately 1/4" from the seam edge, as well as 1/4" from each raw edge (this will cut down on the bulk in the finished side seam).

7. Stitch Velcro in place using two lines of stitching.

8. Fold in half, right sides together, and stitch down both sides approximately 1/4" from the edge.

9. Turn right side out, press and stitch down each edge with just slightly more than a 1/4" seam, enclosing the inside seam.
These snack baggies are even machine washable- turn them inside out, place an extra piece of loop Velcro over the hook Velcro so it doesn't catch on other items, then Wash and dry as normal with like colors.


Monday, August 30, 2010

pizza lunchables


Okay so my kids love Lunchables but I refuse to buy them. With every kid needing lunch it can really add up. Well we came up with our own version of the Lunchable. Pizza seems to be the number 1 choice at our house so this is what I came up with.  I make the crust and put all the toppings into there own individual bags so that they can assemble thier own pizza at lunch. Plus they are alot more healthy with out all the preservatives.

Recipe
1 1/4 cup warm water
1 tbls yeast
1/2 tbls salt
3 c flour
Place all the ingredients into mixer and let the mixer do the work.  You will know when the dough is done because it will completely pull off from the sides of the bowl.  You want a firm dough not to tough. You may need to add more flour or use less flour. 

Cut and roll the dough into  20 balls and let raise until double 15min or so.

Roll into 6 inch circles and bake for 6 min at 400*

Cool and place in to Ziploc sandwich bags. Place a bag of cheese, bag of pepperoni, a bag of sauce (sauce recipe found at the end of the post).

I place all of the them into one giant Ziploc and place in the freezer. They are great and by the time lunch comes everything is still cold and unthawed. They are even great for the kids for a meal when things are a little crazy. So under one hour and less then $7.00 I have 20 pizza lunchables for the kiddos. They love them and constantly have friends wanting to trade with them.

Pizza sauce
1 8oz can of tomato sauce
1 tsp Italian seasoning
1 tsp of brown sugar
Heat all ingredients through and place 1 lg. Tbls into a bag.

Tuesday, August 24, 2010

getting the chores done

One day after I had just finished teaching a class on family organization, a friend approached me and asked, "How did you come up with all of your ideas and chore chart system?"  For lack of a better answer, I gave her my simple one-"frustration."  I have found that if necessity is the mother of invention then frustration must be the mother of organization.
Managing a family of seven and having a strong desire to be organized along with not having great natural organizational skills can cause some frustration.   I have learned to compensate with a lot of creativity and a lot of learning as much as I can from others.  Over time, we have figured out ways to keep our family organized and on schedule even during the chaos.
This week we will be sharing lots of these ideas and details about family organization and chore systems.  But for today, here are a few simple tips that we have learned along the way.

Family organization and chore charts systems:

1.  Keep it Simple:  There are a lot of family chore system ideas out there, but many of them are too complicated to keep up through real life.  They work great for the first week or two, but then as a change in a work schedule, a new soccer season, strep throat for the whole family or a new baby comes along, they are just too hard to keep up. 

2.  Start While Your Kids are Young:   Children who can walk and talk can do simple chores and begin to care for themselves.  Toddlers and preschool age children especially love to feel involved and helpful, but this is also true for older children.  Use their enthusiasm to do things for themselves, to teach them responsibility. 

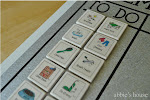
3.  Spell it Out:  Kids do not really know what it means when we as parents say, "Get ready to go today" or "Go clean your room".  They work much better with small assignments.  Give them some sort of list of what they need to do in the morning and a list of things that they need to do to clean their room.  Pictures may be helpful on the lists.  Even if they are readers, pictures are just more fun.

4.  Work as a Team:  Give kids chores when they are young, but work along with them and train them as you go.  Working together is great one on one time and it will all pay off as they learn to do jobs well on their own.  Rotate chores and give everyone a turn.  This helps everyone to feel that things are fair and that your family works together as a team.  This feeling is important in families.

5.  Let Kids be Responsible for Their Choices:  Help children have a good understanding of what their chores are and what happens when they complete or do not complete their chores. Give them some simple and positive incentives to finish.

6.  Use Creativity, Humor, and Fun:  It is what kids (okay all of us) respond to well.  Use these things in abundance and any job is more fun.


The chart above is protected by a copyright and is not to be copied for commercial use.
Related Posts with Thumbnails