Friday, March 11, 2011

little vacation, big adventure

Last fall, when all five of our kids had the same fall break from school we wanted to spend the time doing something really fun. But with only a couple of days and a limited vacation fund to work with we had to get creative.  Inspiration came through a friend who told us about their great trip to to San Fransisco last summer and how a city pass they found made their trip even better.  We couldn't squeeze in a trip to California but maybe a city a little closer to home had a city pass.  One Google search later and there it was, the Salt Lake City Connect Pass.  We found that, through one option, for $36 per person or $30 for kids we could enjoy our choice of 13 different attractions in two days.  That sounds like quite a race, but that is what made our little vacation such a big adventure.

Day 1
9:00 a.m    
Friday Morning began early at the Hogle Zoo just as it was opening.  We headed straight to the giraffe house to catch them in time for breakfast and then worked our way back, to see all the animals as they were coming out for the morning.  We made a stop at the bat house and playground, and then headed out the front gate just as long lines were starting to form.

10:30 a.m.
 The next stop was This is the Place Heritage Park just across the street from the zoo.  After panning for gold and trading it in at the bank, attending school, and checking out some of the other sites we were off again.


12:00 a.m.
The Lion House Pantry is in the heart of downtown and is a definite do not miss on the connect pass.    The menu is different every day, and we loved the chicken, salmon and desserts.


1:00 p.m.
A fun surprise for the day was the Museum of Natural History and was especially loved by our older kids.  Unfortunatley the doors are now closed on the old museum as they are moving to a new building.  It will be open again in later 2011.

2:30

The children's museum, Discovery Gateway, was a great way to spend the afternoon.  There are attractions and activities for kids of all ages, but our favorites were the food market, stage(complete with curtains and costumes), the news station TV set, and the life flight helicopter on the roof.   The Gateway offers great restaurants,  shopping and the fabulous fountains for the kids.


6:00 p.m.
Our day ended on a good note at the Clark Planetarium.  The lobby alone is highly entertaining with three story maze full of balls, marble, lights, bells and whistles.  We checked out the moonscape, and caught a night time show and then called it a day.


Day 2
9:00 a.m.
Saturday started with a trip up the canyon to the Utah Olympic Park.  We watched a few ski jumpers in action before we were treated to a tour.  The kids sat at the top of the ski jumps and bobsled run and were amazed to learn what goes into the winter sports that they usually only see on a TV screen.  The museum offered a close up look at props and memorabilia from the ceremonies and interactive winter sports exhibits.


1:00 p.m.
The trip down the canyon included a picnic lunch at the park before we drove to the Snowbird Ski Resort.  Yes, it is also an amazing place to go in the spring, summer and fall.  The connect pass includes a tram ride for striking mountain views.  If time allows, look into the hiking trails down the mountain.  The resort would also be a great place to spend the night especially if there are off season deals.


3:00 p.m.
After the awesome views from above it was time to check out life under the sea at the Living Planet Aquarium.   Both the small and the tall loved petting the sting rays and laughing at the penguins before the adventure continued on.


6:00 p.m.
The evening started with swinging past our favorite burger stop for dinner as we headed to our last destination, Thanksgiving Point.  The connect pass includes admissions to both the Gardens and the Museum of Ancient Life.  As the sun set, the kids raced and played in the never ending fun of the Children's Garden and the last hour of the day was spent in total happiness at the sand and water table in the museum.


We only made it to ten of the thirteen attractions offered through the connect pass.  We would also love to see the Tracey Aviary, Red Butte Gardens, and the Utah Museum of Fine Arts.  Lucky for us, spring break is coming, so we will see you there.

For a little vacation and big adventure check out the city pass for a city near you.

Monday, February 7, 2011

soft sugar cookies

I love soft sugar cookies and we love to use cookie cutters at our house.  Here is my favorite recipe for soft sugar cookies.

1 Cup Butter
2 Cups of Sugar
1 tsp Vanilla
1 Cup Sour Cream (or Plain Yogurt)
 About 5 1/2 -  6 Cups of flour
2 tsp baking powder
1 tsp baking soda
1 tsp salt

Beat butter and sugar until fluffy. Add vanilla and sour cream.  I tried using yogurt instead of sour cream this last time I made them and they were still really yummy.  Combine all of the dry ingredients into a bowl and them slowly add to butter mixture.  Mix until it forms a soft dough and then chill for about 1-2 hours.  I usually break the dough in half and freeze half for another day.  The whole recipe makes about 4 cookie sheets full depending of the size of cookie cutters you use.  

Roll out (not to thin) and cut into shapes.  Bake at 350 for about 8-10 minutes.  I cook them just until the bottom of the cookies start to turn golden.  If you over cook them that will not be as soft.  We usually eat half the pan warm out of the oven with milk but some still last long enough to be frosted.  

 We used chocolate  and sprinkles on these.  I just melted semi sweet chocolate chips in the microwave and then put them in a baggie and cut off one of the corners to squeeze it out.  I know I am a little crazy but I am not a big fan of really sweet frosting but I do love cream cheese frosting with these.  Hope you like them.   

Wednesday, January 26, 2011

fuzzy fleece headband


You have all seen the cute crocheted or knitted headbands.  Here is my version of something similar if you are like me and still learning to crochet but you are not so great yet.  These are made out of a single layer of fleece and they are very easy.  They could be made even without a sewing a machine.

First measure the head that you are making this for.  For my girls I started with a strip of fleece about 17x3 in.  For an adult, mine were about 20x3 in.  Make sure when you cut the strip that the stretch of the fabric goes around the head.  I then tapered the ends about 4 inches in and then just sew the ends together.  I did use a sewing machine for this but this could easily be hand sewn.  You can then turn it right side out and embellish with a flower, bow, heart, monogram, or whatever you can think of.   Fleece or knit will not fray so I just left the edges unfinished and it turned out great.  I like them because they are light enough to where all day.

1. For the flower I started with a strip about 9x3in.  I then cut 1 inch off to use for the center of the flower.
2. Take the 9x2in strip and fold it into accordion style so that you have 5 layers.
3. Round the top edge with your scissors.
4.  I should look like this when you unfold it.
5.Take a needle and thread and stitch along the bottom and then gather it up into a flower.
6. Connect the two ends to complete the flower.  Use the 1in. strip, tie the end in a knot, and roll it up for the center (use could also use a button).  Stitch it on to the headband.


I made myself a brown and black one. 

And we needed a valentine one.
Some for mom, some for my girls, and a couple for a new little one to be coming soon.

Thursday, January 20, 2011

be mine

Valentines Day is not to far off so why not get started with this fun project. I saw this and just had to share. This would dress up any Valentines Dinner and have your family talking.
Thanks to the Girls at the DIY Dish for sharing this fun idea. Not only for Valentines Day but what about other holidays as well. The possibilities are endless. I can't wait to start on mine.


Thursday, January 13, 2011

creamy chicken taquitos


Try something New and Yummy this week. My kids loved them! I doubled the recipe to make alot, needless to say they also freeze well and make a great sack lunch.

Creamy Chicken Taquitos:
1/3 cup cream cheese
1/4 cup green salsa
1 tbs lime juice
1/2 tsp. cumin
1 tsp. chili powder
1/2 tsp. onion powder
1/4 tsp. granulated garlic
3 tbs chopped cilantro
2 tbs chopped green onions
2 cups cooked, shredded chicken (I used canned)
1 cup grated pepper jack cheese
6-inch corn or flour tortillas
Nonstick cooking spray

Heat oven to 425. Line a baking sheet with aluminum foil and spray it lightly with cooking spray.

Heat cream cheese in the microwave 20-30 sec. so it's soft and easy to stir. Add green salsa, lime juice, cumin, chili powder, onion powder, and garlic. Stir to combine and then add cilantro, green onions, chicken and pepper jack cheese.

Place 2 tbs. of the chicken mixture on the lower third of each tortilla, keeping to about half inch from the edges, and then roll up. Place seam-side down on the baking sheet in a single layer. Spray the tops lightly with cooking spray. Place pan in the oven and bake for 15-20 min or until crisp and the ends start to get golden brown. Cool 5 min and then serve with sour cream, salsa, guacamole or pico de gallo.

Left Overs : Put left overs in a Ziploc and store in the fridge up to a week. Reheat by placing them on a baking sheet and cook for 10 min at 400.

Freezer Instructions: Place unbaked taquitos in a single layer of a baking sheet and place in the freezer for  2 hours or until frozen enough to hold their shape. Pack in a freezer safe container for up to 3 months. To bake, follow the same instructions, thaw or extend the baking time by 10 min.

I love this recipe! New Family Favorite ant our house. I found it in LDS Living mag. and made a few minor adjustments. Thanks LDS Living for inspiring me to try something New.

Tuesday, December 7, 2010

christmas ice decorations


  If you are looking for something to help you look forward to cold freezing weather maybe this will help.   I have always wanted to try these and last year we finally did.  They were very easy and can be made with anything you have at home or in your yard.  Ice can be frozen into luminaries, wreaths, outside tree ornaments, or any other ideas you can think of.


Supplies you will need:
Any kind of pans, dishes, molds, or containers
Berries, greenery, pinecones, orange peel, nuts, etc.
Water and freezing temperatures or a freezer


Bundt pans work great because they already have the hole in the middle.  If not you can place a paper cup or a tin can in the middle of the container weighted with stones.   I placed mine just outside our back door over night.  When you are ready to take it out let it sit at room temperature for a few minutes and then soak the bottom of the pan in warm water for a few minutes.  Hang the wreath with a ribbon or place a votive candle in the middle for a festive center piece or a outside ice luminary.  

They can be very fancy and elegant but very inexpensive if not free.  This is my kind of decor.  We are excited to make them again this year. 

Friday, December 3, 2010

temple picture gifts

Need an idea for Christmas gifts? I made these for my neighbors for Christmas this year.  And the fun part about it is that you can hand it on your tree and then hand it somewhere else to enjoy all year long. I also made them for my kiddos you hand in their rooms.
All you need
one 5x7 picture of the temple
one 5x5 block
Mod Podge
Black paint
Brush
Ribbon
Drill

Start by cutting your picture into a 5x5 square. Paint your block and dry. Once the block is painted Mod Podge your picture on to one side of the block.  Now that your picture is on and dried. Drill holes for your ribbon and lace the ribbon through.

For temple pictures visit my Blog. http://www.hollievansphotography.blogspot.com/  or my Etsy store HolliCycle and you can order them in many sizes. If ordering multiples in the same size I will give you 10% discount

Wednesday, November 3, 2010

chicken wild rice soup

Here is one of or favorite cold weather soups.  A few people have asked me for the recipe and it has taken me a while, sorry everyone.  Those of you who know me know that I really only measure ingredients when I have to.  Sometimes this makes it hard to share a recipe because I am not sure of the exact measurement of all of the ingredients.  So last this time when I made this soup I was a little more careful to write it down.  So here it is.


The recipe I first tried called for cooked chicken and canned chicken broth but if I am going to cook the chicken I might as well make chicken broth as well right. So here is what I start with in my crock-pot.  

Chicken Broth and Chicken:
2-3 chicken breasts
2-3 carrots chopped
1 small onion chopped
1 tsp salt
few shakes of pepper (is that a measurement?)
1/2 tsp celery salt
(I don't always have celery but if you have it use 1-2 stalks and add a little more salt)
1/2 Tb Parsley
I then fill my crock-pot full with water about 8 cups.
Cook this on high for 4-6 hrs or low 8-10hrs.

Sometimes I use dehydrated carrots and onions in the chicken broth instead.  Whatever you have on hand will work.  When the chicken is done scoop out chicken to a cutting board and then strain the broth.  This will make more that what you need for the soup.  I put my extra in a glass jar and put it in the fridge for a later dinner in the week or freeze it in ice cubes trays for longer storage.

For the soup:

Cook 2 boxes of Uncle Ben's Long Grain and Wild Rice (original)  with seasoning according to package directions.
When done add about 3 cups of chicken broth and cubed cooked chicken.
You may also add some the diced carrots or celery from your broth if you like.
Add 1/2 cup of cream (this is a key ingredient) and about 1/2 cup milk.  You can adjust the milk to more or less depending on the consistency you would like.

The recipe really is pretty simple.  If you want to use canned chicken broth and use some other type of cooked chicken that would work also.  Hope you like it!!


Thursday, October 28, 2010

picture blocks

Here is a fun halloween decorations that is personal to your family and pretty inexpensive.  I have seen a lot of these pictures blocks so we decided to try it.  I edited my photos and put the text letter on the photo in Picasa from Google.  It is a free software download that I use a lot.  I am sure there are many other photo editing software programs that would do something similar.  I then had the pictures printed just in regular 4x6 size.  I then cropped the photos a little more to create different heights and to slim them down to fit on the blocks.  
I then cut a scrap piece of 2x4 into the sizes I needed for the photos.  I then sanded and painted the blocks.  Next I put some modge podge on the blocks, stuck the photos on, and then put a top layer of modge podge over the photo.  Last I sanded the edges a little.  This could be made for any holiday.  Happy Halloween!!

Wednesday, October 13, 2010

fun fall leaf pictures

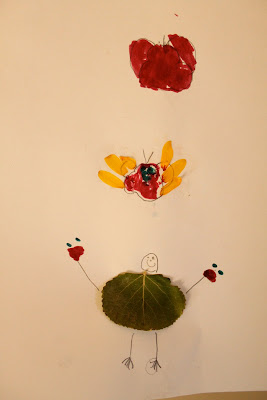
We made these a few days ago and our little girls loved them and it gave us something fun to hang up showing the changing leaves.  First we went on a little walk and everyone collected leaves, fall flowers, seeds, or small twigs. We brought them home, laid them out on the table and everyone started creating.  We found that it works best if you start to draw your creation and then put a dab of glue on the paper and then stick the leaves, flower petals, or twigs on the paper.  You can them finish drawing details if you would like.  Simple and really fun!


Saturday, October 9, 2010

baked potato soup


I grew up in Idaho where fall means the fields are full of busy harvesters digging huge potatoes.  There are all sorts of great ways to eat them, but this is one of my favorites.  It is simple and easy and so good on a cool fall day.


Baked Potato Soup
Bake 4 large potatoes in the oven for 1 hour. 

To make the soup:

1/4 cup butter
1/4 cup flour
Melt the butter in a large pot and then add the flour.  Cook and stir for one minute and then add:
6 cups milk
Continue to stir and simmer over low heat until thickened but do not boil.  Then add:
1 tsp. salt
1/4 tsp. pepper
4 large baked potatoes, peeled and cubed
4 green onions, chopped   (or 2 tbsp. dried chives)

Serve topped with bacon, cheese, and/or sour cream.

Friday, October 8, 2010

pumpkin name settings

If you are in charge of Thanksgiving this year or want a fun get together with friends or family. This ideas is sure to get your guest talking.  This simple ideas was found at Better Homes and Garden. I love it because it is so simple and a fun gift for your guest to take home.

Related Posts with Thumbnails