Showing posts with label summer. Show all posts

Thursday, September 23, 2010

eggplant parmesan

I love Italian food especially when it is made with fresh ingredients. This is one of my favorite dishes it is so light and yummy, made with my favorite things from my garden, tomatoes, eggplant, basil, and garlic. So lets get started.

You will need:
1 lg. eggplant (smaller ones work great for side dishes too.)
2 cloves of garlic
1 lg. tomato
olive oil
5 basil leaves
shredded Parmesan cheese

Start by washing and cutting your eggplant into half the log way. Scoop or cut out the inside of the eggplant leaving just the skin. Chop the eggplant that you removed from the skin into small cubes. Cut the tomato into small cubes and mince garlic as well. Set a side and preheat oven to 350*. In a small pan you are going to heat up about 4 tbs of olive oil and begin to saute your garlic for about 1 min just enough to season the oil. To the pan add your eggplant and season with salt and pepper to your liking. Cook the eggplant for 2 min and remove from heat. Add chopped tomatoes to the eggplant mixture and chopped basil as well. Scoop the eggplant mixture into the eggplant shell. Top with Parmesan and bake for 10-15min. until cheese is browned and eggplant is soft.

Enjoy!

Friday, September 17, 2010

lunch baggies

The perfect Eco-friendly container that's perfect for lunches or trips to the park.
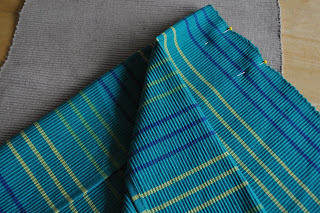
To get started you will need. Fabric, Ripstop nylon, Ribbon, Velcro: fabric supplies.


1. Cut two rectangles of patterned fabric and ripstop nylon, each 13x7".

2. Pin right sides of fabric together, with nylon on the outside.

3. Fold two pieces of 5" ribbon in half and pin them, centered on each short side. The loop should be toward the inside and approximately 1 1/2" of the tails should be showing (so the tabs can be reinforced when you stitch the Velcro).

4. Stitch each short side using a 1/2" seam allowance.


5. Turn right side out and iron the fabric side on a warm setting.

6. Pin Velcro to each short end on the ripstop nylon side, approximately 1/4" from the seam edge, as well as 1/4" from each raw edge (this will cut down on the bulk in the finished side seam).

7. Stitch Velcro in place using two lines of stitching.

8. Fold in half, right sides together, and stitch down both sides approximately 1/4" from the edge.

9. Turn right side out, press and stitch down each edge with just slightly more than a 1/4" seam, enclosing the inside seam.
These snack baggies are even machine washable- turn them inside out, place an extra piece of loop Velcro over the hook Velcro so it doesn't catch on other items, then Wash and dry as normal with like colors.


Monday, August 2, 2010

swap and shop party

A few weeks ago I let you know that I was in the party mood and I had one in the works.  Well I am so excited to show you what I did. And with it being recycle week here at Simply Home and Family what a better time to share my Swap and Shop Party. Times are tough these days and what girl doesn't love going shopping with friends?  The idea of the party was just that. I invited a few friends and had them each bring 5-7 fabulous things that they just don't love any more. They wrote a description or selling point of their item on a tag and then attached it to them. We placed all the items on long tables for everyone to see. I set it up like a boutique. We had some fun things.  A basket with movies and popcorn for a date night, ice cream maker, s-more maker with all the fixings, clothes, jewelry, books, house hold items, toys and much more. I told them to be creative with their items.
After everyone showed up and had a chance to look at all the fun stuff. We visited and ate yummy finger food.
Let the game begin!  All the ladies where given 7 clothes pins to write their name on. This was their frequency to buy the items. I then told them they have 15 min to put their clothes pins on the items that they wanted. After the time was up I held up the item and called out the name of the girl who chose that item so that everyone could see what they got. If there was more than one clothes pin on an item. I put all the clothes pins in a bowl and drew out the winner. I then gave the clothes pins back to the girls who didn't win for them to go place on another item. Everyone got fun stuff and it was all FREE!!

 
We had so much fun and the decorations were a hit as well. I got my inspiration from a roll of wrapping paper (brown and pastel poke a dot). I wanted to keep it as cheep as possible. all of the decorations cost me $20. I shopped at the thrift store and found pink and green plates the I turned up side down for a cake plate look. I used 1/2 pint Mason jars for the glassed. I made my banner, napkin rings, and table runner with the wrapping paper. The Pom poms were from a post we did earlier. I also went through my house and collected any think that was in the color scheme. Everyone had such a good time. I will definitely be doing it again. Thanks ladies for making it so much fun.

Monday, July 26, 2010

summer skirt

I found this cute skirt over at MADE and I just had to make one for my daughter. It is the perfect skirt for the summer and so easy to make.
I adjusted the pattern by adding a few more inches to each piece to make it bigger. This pattern is easy to make smaller or bigger as needed.  Click here for the complete set of instruction by Dana from MADE. A great skirt for spinning.

Monday, July 5, 2010

summer party anyone?

                                                     
       Summer is a great time to have a party. Being outside with friends and family enjoying the weather and the sunshine. Well I found this awesome blog full of the funnest ideas for parties. Kara over at Kara's Party Ideas has ideas for any party that you can think of. I totally fell in love with all the ideas. She got me so inspired that I am throwing a party myself.


The details are so fun and really got my brain working. I can't wait for the party. So fun for a birthday party as well, but who needs a reason to have a party. Happy Party Planing!

Tuesday, June 8, 2010

homemade yogurt

If you are looking to try something new this summer give homemade yogurt a try.  It is great for yogurt popsicles, smoothies, parfaits and so many other great recipes. It has taken some trial and error batches to get this process perfected at my house but it is worth it.  I adapted a recipe that I found at The Hillbilly Housewife.  The ingredients are very simple.


6 cups of warm tap water
    2 cups of nonfat dry milk (hillbilly housewife uses instant so I am sure that both will work)
    1/4 - 1/2 cup store bought plain yogurt with active yogurt cultures        (read the label to be sure)

You will also need a food  or candy thermometer and some kind of incubation device (more explanation later).  


In a large sauce pan combine water and dry milk.  Stir until all the dry milk has dissolved.  Heat over medium low heat  stirring occasionally (so the bottom does not scorch) until it reaches about 175-180 degrees.  I use a digital food thermometer but you could also use a candy thermometer.  This temperature kills of any competing bacteria so the the yogurt will respond better.


You then remove it from the heat and let it cool to about 115 degrees and add the plain store bought yogurt starter.  This takes a little while but if the milk is any hotter it will kill the yogurt cultures.  I like the Dannon all natural yogurt from my starter.  You can also save a little from a previous batch of yogurt but this will eventually weaken so it is good to buy some every few batches.  I have also heard of a powdered culture that can be found at health food stores but I have never tried it myself.  


I then pour it into four clean pint size canning jars and top with lids.  It is now time to incubate it for about 8-10 hours.  Everyone develops there own way of incubating yogurt.  I will share my method but there are many others.


The temperature needs to stay at about 110 degrees for about 8 hours.  I put my jars in a 
slow-cooker (or crockpot), cover them with a dishtowel for more insulation and place the thermometer in also so I can monitor the temp.  My crockpot also has a insulated cover that came with it for traveling so I put that on also.  I turn it on the warm until it reaches 120 degrees and then I turn it off (if I leave it on it gets too hot).  This incubation method holds this temperature pretty close for the time needed.

Some cooks use heating pads, warm ovens, thermoses, or a commercial yogurt maker.  You will have to do some trial and error to figure out what works for you.


After the yogurt is thick I place it in the fridge and it will keep for about two weeks.  It will taste like plain yogurt (not too tasty) but with a little sugar, jam, or honey it is yummy!


I found this honey powder at a local grocery store and I love it for yogurt and smoothies.


This is one of our favorite breakfasts.  I use freeze dried strawberries and our granola recipe found here.  
There is so many recipes to try.  It can be made into yogurt cheese, frozen yogurt, can be mixed with sour cream or mayo, used like buttermilk, and so many others. 

There is a video from the food network TV show Good Eats  about yogurt that has some interesting information.  His recipe is a little different but he explains the food science about yogurt.  I learned that if you are lactose intolerant you may still be able to eat yogurt because the lactose is broken down in the process.


Thursday, June 3, 2010

placemat beach bag


This easy beach bag was created from:
  2 placemats
  6-10 inches of 45 inch wide fabric
  4 large rivets

To create one:
Start with each placemat right side up, fold the top down four inches and pin into place.


 Put the two placemats together with the folded sides in.  Sew both edges and the bottom.  Then turn the bag right side out.

Now for the handles.  Cut two strips of coordinating fabric 3-5 inches wide and 36-45 inches long.  The straps on the one shown are 3x45.  Iron the edges in 1/4 on each side and then fold in half and iron.  Sew the edge and ends to make the strap.

Mark the spots for the rivets and cut holes to fit the rivets into.  Using a rivet placement tool and hammer, put the rivets in.

Thread the straps through the holes and tie knots in the end.

Load it up and head for the beach!

Tuesday, June 1, 2010

break out the flip flops for summer


We have made a little collection of fun embellished flip flops for the summer.
We embellished some interchangeable flip flops at our house with some simple flowers and some sticky velcro.  Create whatever flower you would like and them place velcro on the back of the flower.  Place the other side of the velcro on the flip flop.  We have had good luck with the sticky back velcro but you could always reinforce it with some super glue or E6000 if needed.  

Here area some other ideas that we loved.

Black ruffles with flowers at sWeeT cHarLi.
Crocheted with pink buttons at craft stylish.


A great tutorial for interchangeable flip flops at Makeit andloveit.


You may need this same solution at your house.  I know that we do.  Here is a "stay on strap" for the little feet around your house at Shannon Makes Stuff.


Thursday, May 20, 2010

kids picnic table

It is that time of year when all the backyard toys and gear come out of storage.  For us that means pulling out the kids picnic table that is stored flat against the wall in the shed.  We found the idea for this table including full printable instructions at Family Fun and it is a genius design! 
Here is why we love it:
--The entire table is made from one sheet of 4-8 plywood. 
--The pieces just fit together to create the table(no nails, screws, etc.) and can then come apart to store flat for storage. 
--It is portable.  There are two small pieces that will hold all the table parts together so that it can be carried to the neighborhood BBQ.   
--It is small and simple for children but it is big enough that adults can sit at it too. 
--It is durable and designed to hold up.  This one has been around for 8 years of picnics, tea parties, art projects, mud pies, garage sales(warning: people will want to buy it) and neighborhood BBQs.  Considering that we made it from a used, low quality plywood just to see if we could build it, it has done it's duty well.

Needless to say we have created several more since this one and will be painting a new smooth higher quality one in the next few weeks  even though we are not sure if we are ready to give this old one up yet. 


Tip: When we made additional tables, we chose not to cut the carrying handle hole in the table top because we found it was easy enough to carry without it and we didn't want the hole in the table. 
 
                          Family Fun Magazine  Table                                                 Our Family's Table

Sunday, July 5, 2009

summer strawberry shortcake


I love strawberries!!! Strawberry Shortcake has always been one of my favorite summer foods especially when the strawberries are fresh from the garden. My mom always made this classic biscuit like shortcake when I was little and I love it warm from the oven covered with strawberries and cream. I braved turning on the oven on this hot summer day for this yummy summer dessert and it turned out so good!!

2 Cups of Sliced Strawberries
1/2 cup of Sugar
1/3 cup of Butter
2 cups of Flour
1/4 cup of Sugar
3 tsp. Baking Powder
1 tsp Salt
1tsp Vanilla
3/4 cup Milk
Whipped Cream

Sprinkle the 1/2 cup of sugar on the sliced strawberries and then let is sit. The sugar will draw out all of the juices.
Heat oven to 450 degrees.
Place butter, flour, sugar, baking powder, and salt in food processor or blender until mixture looks like fine crumbs.
Place crumbs in a bowl and stir in vanilla and milk just until combined.
Place dough on a lightly floured surface and gently knead. I had to add a little more flour here because mine was still a little sticky. Knead about 20 times and then roll it out to about 1/2 inch thick. Cut out whatever shape you would like. You could use cookie cutters, the top of a cup, or just cut it into squares.
Place them on a greased cookie sheet about 1 inch apart. I then sprayed mine with cooking spray and added a dash of cinnamon sugar on the top.
Bake these for 8-10 min until they are golden brown.
Split shortcake and fill with strawberries and cream.
Makes about 10 shortcakes.


Related Posts with Thumbnails