Monday, March 29, 2010

easy art smock


I am sure that I am not the only mom who is a little hesitant when my little one asks to paint. I have been looking for some kind of water proof art cover up for my little girls (some way to contain the mess). Well I thought up this the other day so here it is.
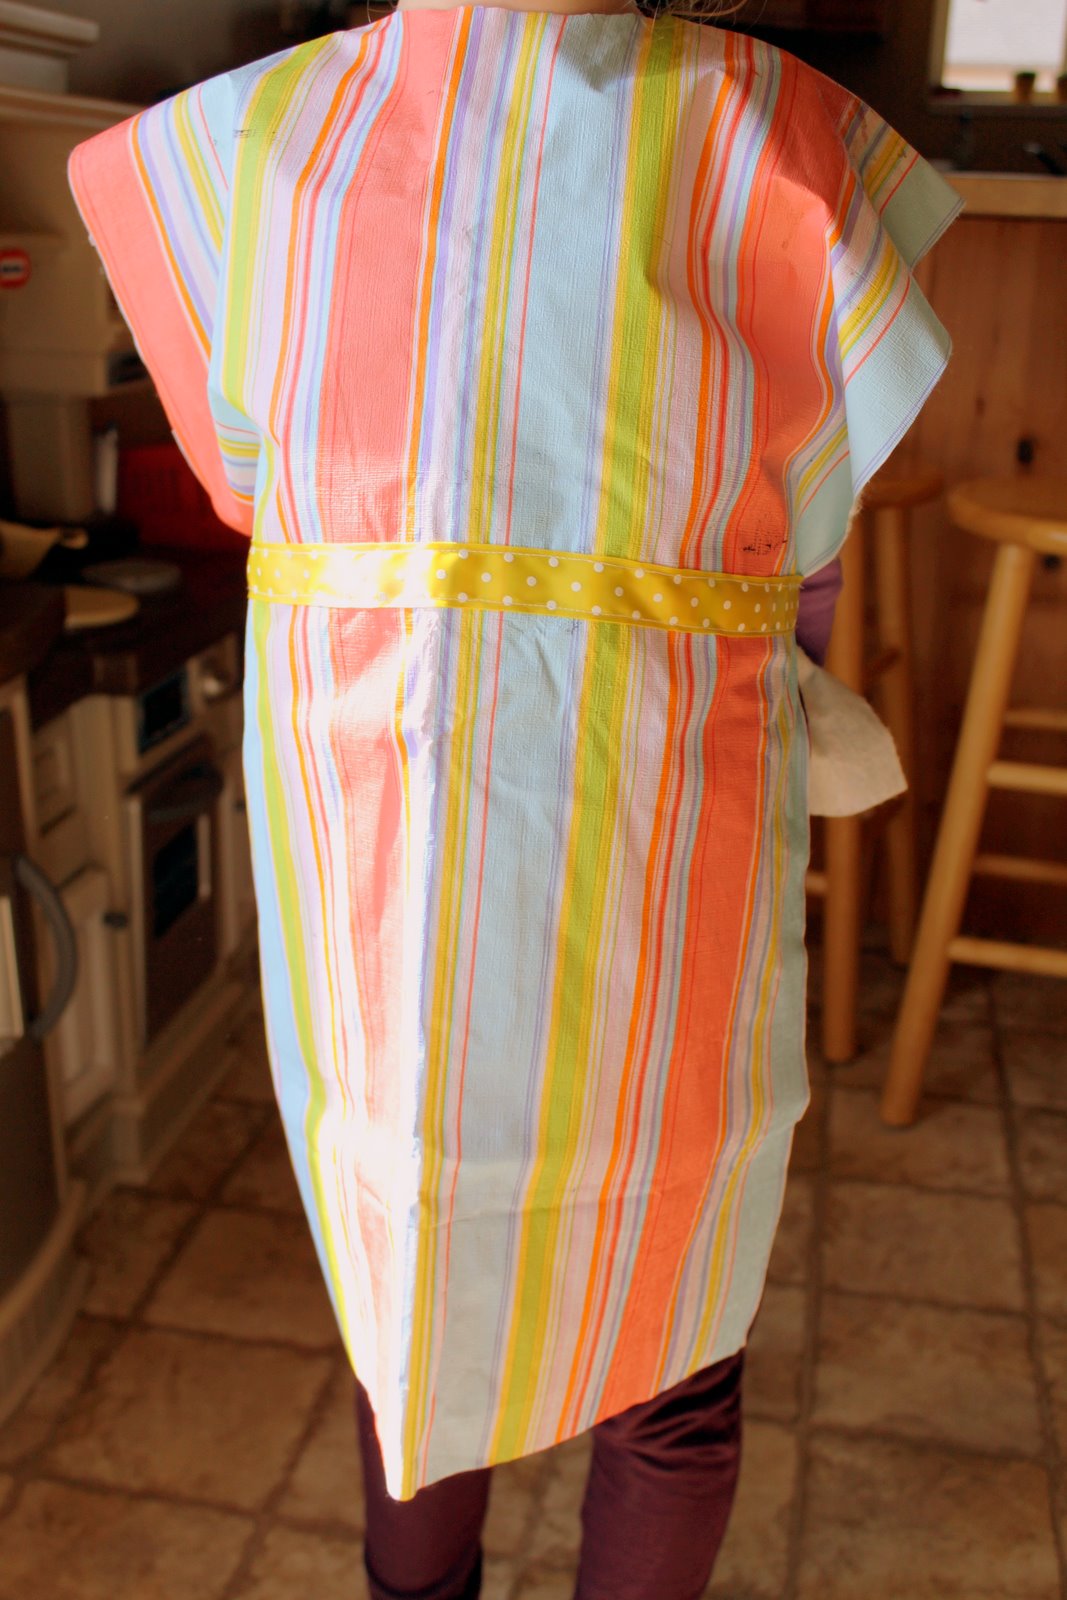
I started with a vinyl tablecloth I had on hand for a painting drop cloth. You know the kind with the fuzzy back. This is perfect because it is water proof, can be wiped clean easily, and no need to sew because the edges will not fray. You could probably get a few out of one tablecloth depending on the size.


I measured my kiddos to get the width and the length and then cut out this shape. Mine measured about 40 in long and 16 in wide. I traced a small bowl for the neck hole.


As you can see I just added velcro to the back and sewed a ribbon on the front to tie in the back. You could also glue the ribbon on to make this a complete no sew art smock. Since I have made this I have seen some cute polka dot, flowers, and stripe tablecloths in the Easter decorations in many stores so now would be a great time to find one. These are good for not just painting but any messy projects like egg dying, anything with frosting or glue, you get the idea.

Hope this helps you enjoy time with your little ones with a little less mess.

Tuesday, March 9, 2010

easy shamrock decor

As I finally got around to putting away all of the Valentine's decorations I realized that I didn't really have any St Patrick's Day decorations. I didn't really want to spend any money so this is what I came up with.
I just cut a shamrock out of a piece of paper and then traced it onto some scraps of fabric that I had. I cut two per shamrock and then sewed them wrong sides together leaving a little hole to stuff them. My girls stuffed them for me and then we sewed them up. I tied a little piece of gold ribbon to the stem and here they are. After a few I just cut them out without a pattern and I actually liked them better. With the raw edges and each a little different size and shape they have fun character.


You could put them in a basket like this, use them on a table, hang them in a window or on a door, or hang them from your dining room light. They were fast, very inexpensive, and kid friendly.


I think that they will make it in time. Here is what they look like today, 5 days later.

Friday, March 5, 2010

growing lucky clover


We thought it would be fun to grow a little luck this year. We started with some little terra-cotta pots and painted them gold with a little glitter paint for sparkle.


We found some clover seed at a local seed and garden store. This is usually sold in large amount with grass seed so a small amount is very inexpensive. We soaked the seeds in water for about 5 hours (we thought this might speed up the process a bit) and then planted them in some potting soil.


We placed them in our windowsill and we are hoping they will make it one time. We probably should have started them a little sooner but at least we can enjoy it the whole month of March right. We will keep you posted on how long it takes and then we can plan better for next year.

We hoping for something like this.


Wednesday, March 3, 2010

focaccia bread


I discovered this recipe last week on the Studio 5 website (love this site), and have made it six times since then. It is so simple and easy but it makes a fabulous artisan like bread.
Check out the Kathleen Alder's recipe on the site and watch the video with her. She gives great tips and she also explains how to make it into pizza.
Here is the basic recipe and my tips to go along with hers.

3 cups flour
1 2/3 cups warm water
2 T. sugar
1 1/2 tsp. salt
1/4 tsp. yeast


In a medium bowl, mix all the ingredients together, until moistened. It will be a very soft dough. Cover tightly and let sit at room temperature for 12-24 hours. Then pour the bread onto a greased baking sheet and carefully spread it out, without disturbing it too much. Drizzle with olive oil and top with anything else you would like (my favorite toppings are basil, coarse salt, and fresh Parmesan). Let rise for 15 to 20 minutes and then bake at 450 for 20 minutes.


I found that:
-it is really done in about 18 minutes.
-the bread will stick unless the pan is sprayed really well. Coating the pan with cornmeal also helped.
-trying to do it quickly (in about an hour) makes a warm bread but nothing like the the really good bread that comes from sitting for 12-24 hours.
-it only takes a few minutes to mix it up the night before or in the morning and then it can just be forgotten about until it is ready to bake for dinner.
-when it is time to bake the bread, turn on the oven to preheat while putting the bread on the pan and letting it raise. By the time the oven is preheated the bread will be ready to bake.
-almost anyone can make this bread and everyone I know who has, loved it.

Friday, February 26, 2010

quick tip for today

Just thought we would share a quick tip for today. Whenever I have an orange or any other citrus I put a couple pieces of the peel in our kitchen sink disposal to clean it and give it a nice fresh smell.
I never thought of freezing them so you have them on hand all of the time. I read this is some magazine the other day at the library but I can't remember which one.

Anyway I put some in a baggie and through them in the freezer. They work great!! I don't really like to eat grapefruit but it is one of my favorite smells, good thing my husband likes it.

Tuesday, February 23, 2010

fancy nancy birthday party

I am sure that there are many little girls (and moms and grandmas) that love Fancy Nancy as much as we do so we decided to share a few ideas that we used for our birthday party. This is the original book and it is one of our favorite. The best thing about Fancy Nancy is that she finds everyday items around the house to make everything fancy so that is what we decided to do.

We just did simple invitations on the computer with our own fancy wording.


We had everyone come dressed in something fancy. My husband and I did the same and the girls loved it. My husband had an old choir costume complete with a bow tie and the girls picked out whatever they thought was fancy in my closet. When everyone arrived we had them decorate their own fancy name tag on a paper doily.

We had a bubble machine outside and guests arrived, we used plastic stemware from the dollar store, fancy folded napkins, and frilly toothpick for the food.


We read the Fancy Nancy story, painted our fingernails, brushed on glitter, and made these fun ribbon bracelets to twirl with. We has a little fashion show and dancing while we took each girls picture. We then ate a light brunch and some ice cream parfaits. I found a fun sparkler candle for the birthday girl that was super fancy but a little smokey for inside (live and learn).


At the end the birthday girl gave each of her guests a fun bubble cake necklace and their fancy picture from the fashion show.

We had a great time and hope the girls did too.

This party was a great way for our little birthday girl to learn manners, etiquette, and creative fun ways to be fancy with everyday things.

Tuesday, February 9, 2010

valentine love pillow

This is our family love pillow that we just started around the first of February this year. We wrote this little poem to explain how it works.

This is a little love pillow
And this is what you do,
A simple act of love
For someone that loves you.

Find a secret act to do
Then sneak it on their bed
They will know that they are loved
Even more that words have said.

It is now their turn to pass it on
To someone of their choice
To show the love they have for them
With service as their voice.

Sometimes we find it hard to say
Those simple little three
So show the ones you care about
You love them and they will see.


Our little girls have loved this!!! They are so excited when they see it on their pillow and I love it because it stretches LOVE and Valentine's Day out for many days.

Tuesday, February 2, 2010

cute valentine hairdo

Valentine's Day is one of my favorite holidays. Here is a little fun hairdo that my girls ask for a lot. We have seen many similar styles around on many other blogs. There are many fun hair blogs around if you are looking for new ideas. We posted some of our favorite not to long ago here.
The basic idea of this kind of heart is a pull through ponytail. Instead of pulling the ponytail down through the top you pull it up from the bottom and then divide the hair in two for each side. You can braid the two sides or just twist like the picture below. Then you just secure it at the bottom in a ponytail or bun. Give it a try.


Monday, January 25, 2010

brownie mix and brownies


Today was the day! I have this little obsession of getting a pretty good recipe and then adjusting it (taking out as much sugar, fat, etc. as possible and then making it as simple as possible) until it is perfect. I have been working on this one for a year or two and it may still have plenty of the make it taste great stuff but it is simple, easy and today, finally perfect.


It starts by making a mix. This simplifies the whole process by making half of a few batches of brownies all at once.


Brownie Mix
6 cups flour
8 cups sugar
2- 2 1/2 cups cocoa
2 tsp. salt

Mix all the ingredients in a large bowl with a whisk. Store in an airtight container. A Zip-lock bag works great but remember to label it or it may turn into a bag of brown mystery powder in the pantry. And, yes I may be talking from experience.


Brownies
Preheat oven to 350.
4 cups brownie mix
1/2 cup butter
4 eggs
1/4 cup water
1 tsp. vanilla

Melt the butter and then cool to room temperature. Mix the four eggs, water and vanilla into the butter. Add this liquid to the brownie mix and stir. It will be fairly thick. Spread into a lightly greased 9x13 baking pan. Bake for 30 to 33 minutes and, as with anything chocolate, ENJOY!

Friday, January 15, 2010

fun felt birthday cake

My girls love to play birthday party. They were always stacking up cups for the birthday cake so when I saw this cake at ikat bag I thought I would give it a try.
You first start with three foam circles. My nice husband was kind enough to cut these out with our electric carving knife. We probably only use this knife once or twice a year but it sure does come in handy. Mine were about a 4,6,8 inch circles.
I left the top two circles whole and covered them in felt but I cut the bottom piece into six pieces and then covered them individually. This way they could serve one piece cake to party guests.
The decorations and candles are the fun part. Everything sticks on with velcro. I cut out polka dots and hearts for the cake decorations.

Candles:
Cut a rectangle shape out of felt.
Embellish with ribbon.
Sew in a tube shape
Cut two circles for the top and bottom.
Make a flame shape and hot glue together.
Cut a slit in top circle and insert flame and hot glue under side so it won't pull out.
Glue a small piece of velcro to the bottom piece.
Stuff and sew on top and bottom with a blanket stitch.

Make a Wish!

Monday, January 11, 2010

we LOVE birthdays

Is there anyone under that hat???

We LOVE birthdays at our house. Who doesn't? I bought this birthday hat at the dollar store a few years ago and it has become a great tradition at our house. This hat is always waiting for you at breakfast when you wake up on your birthday morning and it can be worn where ever and as much as you would like only on that their day. (We found one at Oriental Trading Co. in primary colors for Dad so he would have to wear a pink one.)

Family traditions are what make fun memories even if they are simple like this.
The other birthday traditions that our girls love are:
*Choose the menu for the day; breakfast, lunch, and dinner. My mom did this when I was little and I loved it.
*Other family members pick up your jobs for the day.
*You can stay in your pajamas all day if you would like.
Here was the outfit of choice for this year. Great for dancing!!!

Friday, December 11, 2009

fun and fancy hairdos


When I was a little girl I loved having a french braid crown around my head. Now that I have some little girls of my own they love fancy hairdos as well especially for fun holidays like Christmas. They don't always turn out perfect but I am getting better with more practice. I thought I would share a few fun blogs that I found where I get ideas.

(It looks like she may be taking a break from her blog but she will leave her great ideas there so you will have to check it out. )


There are all types of hair styles for those just learning and some for advanced hair stylists. This is an example of a style that requires no french braiding and stays in really well for shorter hair. It is fun to have new ideas for the holidays. Here are some of our other favorites.

Related Posts with Thumbnails