Monday, June 21, 2010

turkey pesto panini

One of our favorite summer meals begins with basil from the herb garden in our back yard.  We have grown it for a few years, and have found it is easy to grow and we love the pesto we can make from it.
Pesto:
1/2 cup pine nuts or almonds
4 cups fresh basil leaves  (can also use some parsley)
1/2 cup grated Parmesan cheese
1 garlic clove
salt and pepper
1/2 cup olive oil
If using pine nuts, toast them in a 350 degree oven for 6-8 minutes.
Place all the ingredients except the olive oil in a food processor, and process until finely chopped.  Gradually  pour the in the olive oil while the processor is running.  Remove from the processor, and cover the surface of the pesto with plastic wrap to keep from turning brown.


Turkey Pesto Panini:
sourdough bread
sliced turkey
swiss cheese, sliced
pesto
Spread pesto on the bread and top with the turkey and cheese to create the sandwich.  Brush the outside of the sandwich with olive oil and cook in a pannini maker or indoor grill until warmed through and cheese is melted.
Top sandwich with:
lettuce
tomato slices
red onion slices
balsamic vinegar.
Enjoy!

Saturday, June 19, 2010

paint with water


This is one most simple backyard activities but it still keeps our kiddos entertained while I fix dinner or get a small project done. I remember loving this when I was a littler girl. Our girls love to try different types and sizes of brushes. This is almost mess free, can be done on any small patio, deck, for sidewalk.  They love to pretend to paint their fingernails or use ice cubes and a very hot summer day.

Thursday, June 17, 2010

grilled pizza

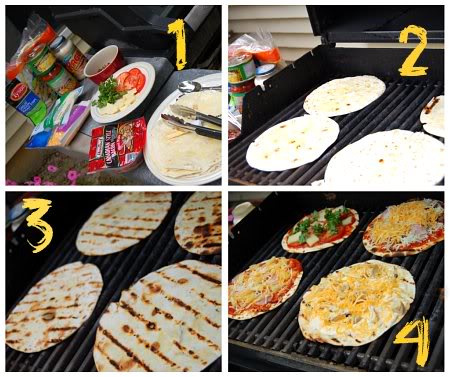
I am always looking for different ways to spice up the same old dinners that we eat regularly. This was a winner at our house. I am sure that this will be a regular request this summer. Thanks to Tidy Mom for this fun new summer idea. Head on over to get all the step by step instructions.

Tips I found when I made them:
Flip the tortillas just when they have grill marks and watch them closely.
After putting the toppings on, it will only take a few minutes before they are done. 

Happy Grilling!

Wednesday, June 16, 2010

i love daddy sign with 2x4s

This is a simple sign to celebrate father's day.  This is my version of one similar that I found on How Does She.  I created three 4x6 collage pictures in Picasa (Google photo organization and editing program) because we could not decide on just three.


I started with three boards two 2x4s and one 2x2 (this was a scrap I found to make it high enough to hang the pictures).  You could always just crop to smaller pictures and use two boards.  I applied scrap book paper with modge podge (I need to practice at this a little more because there are some bubbles but at least they are behind the pictures right).  I then sanded the sides, distressed the edges with some ink,  and applied the vinyl.


Then stack them up and tie a piece of ribbon around the top block and clip on some mini clothes pins with ribbon to hold your pictures.  We love our daddy!

Tuesday, June 15, 2010

mini tie key chain

We loved this cute little key chain we found at Creative Itch.  
It is simple enough for the kids to make for Dad.

Monday, June 14, 2010

father's day sweet thoughts

Found this fun idea on Love, Actually and decided to make my own. Sweet Thoughts Jar for Father's Day. What father wouldn't want to get this on Father's Day. The jar is full of fun thoughts and memories about him. Every time that daddy reaches in to take out one of his favorite candy bars for a sweet treat then he will be reminded of one sweet reason we love him.

Supplies that you will need: His favorite candy bars, jar, tape or glue, love notes, and scissors.  Cut up all the love notes and tape or glue them on the candy bars. Fill the jar.
To download a copy of this label for your jar, click here.
Have a Happy Father's Day!

Saturday, June 12, 2010

these mini cakes...

look impressive and are a clever way to honor the "King of the Grill" on Father's Day. Dad's are sure to feel like royalty when they sink their teeth into these brownies. I will admit that baking is not my specialty but when these cakes were featured in FamilyFun this month...I decided to give it a whirl! They turned out perfect! They are also easy enough that little ones can help. These cakes are sure to sweeten your Sunday. HAPPY BAKING!

To make a batch of 12, place liners in a muffin pan, oil them, and fill them two thirds full of your favorite brownie batter, then bake according to the recipe directions. Let the brownies cool.

In a small bowl, mix one or two drops of black food coloring with 1/4 cup white frosting. Transfer the frosting to a ziplock bag and snip a small section from the corner. Pipe grate lines onto each brownie and let them set for 20 minutes. Add embers with a sprinkle of orange sugar.

Prepare the grill food as instructed below and press it in place atop each brownie.

Kebabs = A caramel cream and red, yellow, and green candy fruit slices, cut into small pieces + toothpick skewers

Pork chop = two thirds of a caramel cream, molded with fingers + black food coloring, applied with a toothpick

Hot dogs = Hot Tamales candies + black food coloring, applied with a toothpick

Friday, June 11, 2010

more than just a new shirt

Go the extra mile this Father's Day and put a twist on the traditional new shirt and tie for Dad by tidying up his closet space. The biggest key to a tidy closet is hangers that are uniform in shape and color. I prefer white because it doesn't over power the clothes. You can buy 10 -12 hangers for about $1. Oraganize his shirts according to color and season. Consider freshening up his older shirts with a trip to the dry cleaners or an afternoon of ironing. Have your children write notes of endearment that can be placed in the pockets along with a favorite candy bar, tickets to a game, a gift card for a night out, etc. There are countless ideas that can make this specific to the dad in your house. If you are feeling super ambitious, tackle his shoes also. Polish those that need it and create space for them to be stored in an orderly way. It would be cute to put a new sleeve of golf balls in his tennies, or a gift card to his favorite lunch spot in his work shoes.

Thursday, June 10, 2010

cool ties for father and son

I loved this little tie from a cute etsy shop called Trendy Tikes.  It would be really fun to buy matching ties for the little guy and his daddy this Father's Day.

Tuesday, June 8, 2010

homemade yogurt

If you are looking to try something new this summer give homemade yogurt a try.  It is great for yogurt popsicles, smoothies, parfaits and so many other great recipes. It has taken some trial and error batches to get this process perfected at my house but it is worth it.  I adapted a recipe that I found at The Hillbilly Housewife.  The ingredients are very simple.


6 cups of warm tap water
    2 cups of nonfat dry milk (hillbilly housewife uses instant so I am sure that both will work)
    1/4 - 1/2 cup store bought plain yogurt with active yogurt cultures        (read the label to be sure)

You will also need a food  or candy thermometer and some kind of incubation device (more explanation later).  


In a large sauce pan combine water and dry milk.  Stir until all the dry milk has dissolved.  Heat over medium low heat  stirring occasionally (so the bottom does not scorch) until it reaches about 175-180 degrees.  I use a digital food thermometer but you could also use a candy thermometer.  This temperature kills of any competing bacteria so the the yogurt will respond better.


You then remove it from the heat and let it cool to about 115 degrees and add the plain store bought yogurt starter.  This takes a little while but if the milk is any hotter it will kill the yogurt cultures.  I like the Dannon all natural yogurt from my starter.  You can also save a little from a previous batch of yogurt but this will eventually weaken so it is good to buy some every few batches.  I have also heard of a powdered culture that can be found at health food stores but I have never tried it myself.  


I then pour it into four clean pint size canning jars and top with lids.  It is now time to incubate it for about 8-10 hours.  Everyone develops there own way of incubating yogurt.  I will share my method but there are many others.


The temperature needs to stay at about 110 degrees for about 8 hours.  I put my jars in a 
slow-cooker (or crockpot), cover them with a dishtowel for more insulation and place the thermometer in also so I can monitor the temp.  My crockpot also has a insulated cover that came with it for traveling so I put that on also.  I turn it on the warm until it reaches 120 degrees and then I turn it off (if I leave it on it gets too hot).  This incubation method holds this temperature pretty close for the time needed.

Some cooks use heating pads, warm ovens, thermoses, or a commercial yogurt maker.  You will have to do some trial and error to figure out what works for you.


After the yogurt is thick I place it in the fridge and it will keep for about two weeks.  It will taste like plain yogurt (not too tasty) but with a little sugar, jam, or honey it is yummy!


I found this honey powder at a local grocery store and I love it for yogurt and smoothies.


This is one of our favorite breakfasts.  I use freeze dried strawberries and our granola recipe found here.  
There is so many recipes to try.  It can be made into yogurt cheese, frozen yogurt, can be mixed with sour cream or mayo, used like buttermilk, and so many others. 

There is a video from the food network TV show Good Eats  about yogurt that has some interesting information.  His recipe is a little different but he explains the food science about yogurt.  I learned that if you are lactose intolerant you may still be able to eat yogurt because the lactose is broken down in the process.


Thursday, June 3, 2010

placemat beach bag


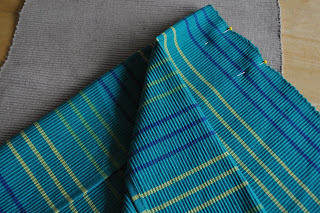
This easy beach bag was created from:
  2 placemats
  6-10 inches of 45 inch wide fabric
  4 large rivets

To create one:
Start with each placemat right side up, fold the top down four inches and pin into place.


 Put the two placemats together with the folded sides in.  Sew both edges and the bottom.  Then turn the bag right side out.

Now for the handles.  Cut two strips of coordinating fabric 3-5 inches wide and 36-45 inches long.  The straps on the one shown are 3x45.  Iron the edges in 1/4 on each side and then fold in half and iron.  Sew the edge and ends to make the strap.

Mark the spots for the rivets and cut holes to fit the rivets into.  Using a rivet placement tool and hammer, put the rivets in.

Thread the straps through the holes and tie knots in the end.

Load it up and head for the beach!

Tuesday, June 1, 2010

break out the flip flops for summer


We have made a little collection of fun embellished flip flops for the summer.
We embellished some interchangeable flip flops at our house with some simple flowers and some sticky velcro.  Create whatever flower you would like and them place velcro on the back of the flower.  Place the other side of the velcro on the flip flop.  We have had good luck with the sticky back velcro but you could always reinforce it with some super glue or E6000 if needed.  

Here area some other ideas that we loved.

Black ruffles with flowers at sWeeT cHarLi.
Crocheted with pink buttons at craft stylish.


A great tutorial for interchangeable flip flops at Makeit andloveit.


You may need this same solution at your house.  I know that we do.  Here is a "stay on strap" for the little feet around your house at Shannon Makes Stuff.


Related Posts with Thumbnails