Friday, December 11, 2009

fun and fancy hairdos


When I was a little girl I loved having a french braid crown around my head. Now that I have some little girls of my own they love fancy hairdos as well especially for fun holidays like Christmas. They don't always turn out perfect but I am getting better with more practice. I thought I would share a few fun blogs that I found where I get ideas.

(It looks like she may be taking a break from her blog but she will leave her great ideas there so you will have to check it out. )


There are all types of hair styles for those just learning and some for advanced hair stylists. This is an example of a style that requires no french braiding and stays in really well for shorter hair. It is fun to have new ideas for the holidays. Here are some of our other favorites.

Tuesday, December 8, 2009

simple christmas ornament

My sister has some similar ornaments like these on her Christmas tree and they are some of my favorite. This year I finally decided to make some. They are really quite simply to make.

1. Begin with some clear glass christmas ornaments. Every craft store has some in many different sizes. I found these at Hobby Lobby. They can be a little tricky to find this time of year because they are a popular item.

2. Find an image that you would like to use. It could be a family picture, you can scan an image in, or use an image on your computer.

3. Decide how big your image needs to be for your glass ornament. Mine was a square about 2.5 inches. You can put many of one page and then print them out.

4. I took mine to a local copy center and had it copied on to a transparency. This allows you to see the image from both sides.

5. Cut them out and round the corner to create a circle.

6. Roll them up and stick them into your glass ornament. I used a pair of tweezers to get them positioned just right.

7. I added a little glitter snow to sit in the bottom and tied a ribbon to the top. All Done!!

I love how you can personalize these with whatever picture you would like. We made a bunch for little gifts for friends and teachers. I now need to make our tree some.

Thursday, December 3, 2009

the great gift idea exchange - part two

This took us a little longer to complete than we thought due to the fact that we have both been fighting the flu with our families. We apologize for the delay.

Here are the rest of our favorite gift ideas. May they help you in your gift buying quest!


Frosty the Snowman Kit
Include a hat, scarf and gloves made from felt. The carrot nose, black eyes and buttons can be made from felt or wood and put on dowels to poke into the snow. My kids received one of these from an aunt a few years ago and they are still excited to get it out and use it each winter.

May you have a fun and FROSTY holiday!


Gift card for dinner and/or a movie
Sometime when families have to cut back financially these are the first things to go. Whatever the case may be, this give families an opportunity to spend time together having fun during the Christmas holiday.

May you make wonderful family memories this Christmas season.


Heat Pack
Make a small pillow and instead of stuffing it, fill it about 3/4 full of rice, wheat, or dried corn. It is a good idea to make a little pillow case with ties for a cover that comes off to be washed but it works with or without one.

A 5x7 pillow takes about 1 minute to heat up in the microwave and will hold it's heat for a while. Be careful not to over heat these and do not use them with babies or anyone in a condition where they can't tell if it is too hot. My kids like to put them in their beds just before they get in. They also work well to warm up cold hands and feet that have been playing in the snow and soothe sore muscles after a day on the slopes. It makes a great gift for kids and also works as a family gift.
May you have a WARM and wonderful holiday.


Dinner Kit
Include all the ingredients for a favorite dinner and if you would like to add to the gift, include a new pan, or bowl, or apron. Here is a favorite:
Fill a new pot with:
1 can black beans
1 can pinto beans
1 can tomato sauce (small)
1 can corn
1 bottle salsa (small)
1 package taco seasoning
1 bag tortilla chips


Add instructions and a list of any other ingredients needed.

To make taco soup dinner you may also need:
1 pound ground beef
grated cheddar cheese
sour cream


Instructions: Drain and rinse beans. Put 4 cups water, 1/2 cup of the salsa and all the other ingredients in pot and bring to a boil. Add 1 pound browned ground beef if desired. Turn down heat and simmer for 10 minutes.

Serve in bowls with chips, cheese and sour cream. Enjoy!
Muffin Mix
Mix up a big batch of our muffin mix and put 3 cups in each cute cellophane bag. Tie with a bow, and add instructions and a card.


Magnets and magnet board

This is a great gift for a teen or for a whole family. We created this one by filling the frame with metal that we cut to fit and covering if with a favorite scrapbook paper.


Embroidered Pillow
You could find a pattern for this or just print out a fun saying in your favorite font. Place a piece of muslin over the paper and trace the print. Embroider, sew the pillow, and stuff. This is fun for young kids to make.


Fun Holiday Decor
A snow man rug, a festive throw pillow, holiday paper towels or just a big pack of red napkins tied in a green bow. These things are fun additions to any one's holiday and kids love little details like this to spruce up for the season.


Personalized Gift Certificate Gift

Create a fun personalized gift like:

a purse filled with a gift card to a favorite store, a gift card for lunch nearby and a certificate for a shopping friend for a day.

an apron, wooden spoon and a certificate to a cooking class.

a space poster and tickets to the planetarium

(If the gift is for a child include a certificate for free taxi service provided by you.)


HAPPY GIFTING!

Tuesday, November 24, 2009

the great gift idea exchange - part one

We have so many great gift ideas so we are excited to share them with you. Some gifts would be great for family and others are smaller that would be great for neighbors, teachers, and friends. We decided to share 5 ideas at a time so here is our first five. The others will be posted in days to come.


1. Lantern with Candle- These are a beautiful addition to holiday decor and a scented candle only helps this cause, but we also found when our power went out , this makes a safe and practical source of light. It would also be fun to etch the family initial on the glass First get the stencil made out of vinyl and then follow the directions on the etching cream which can be found at most craft stores. The lanterns are available at IKEA for $6.99.
May your holiday be merry and bright!


2. Windshield Wiper Fluid- If you live in a cold area get the kind that doesn't freeze. Add a cute little tag like. This would also work for some fun hand soap.
Here's washing you a Merry Christmas!

3. Family Fleece Blanket- These are especially fun with the family name embroidered on it.
May you have a warm and wonderful holiday.


4. Wooden Block Photo Puzzle - I think these are so fun. Here are a few different instructions.


puzzle-block-4.jpg


Block+photo+puzzle+065.jpg


5. Your favorite family card or board game.
May you have a FUN and wonderful holiday.


congratulations to our winners!!!

Thanks for all your comments and great gift ideas. We almost have them complied and ready to post. Our Great Gift Exchange winners are Kim and Alysha. Kim won the growth chart sticker and Alysha won the apron. Congratulations and thanks again!

Friday, November 20, 2009

simple way of giving thanks


Make a thankful book.

This would be a great activity for little ones while waiting for the delicious dinner or anytime this next week. All you need is:
Scissors
Old Magazines
Paper
Glue
My 4 year old loves loves to cut, glue, color, and tape so this was to perfect afternoon activity at our house. For others not so good with scissors yet I has a pre-cut pile of pictures from old magazines to choose from. We stapled a few pages together to make a book and they decorated to cover. We then chose all sorts of things that we were grateful for and pasted them on all the pages. It was very simple but very fun.

Here are some other Thanksgiving ideas that we thought would be fun.

Tuesday, November 17, 2009

oops, how to get stickies off your iron


Ironing Dryer Sheets
I am sure I am not the only one that has made this mistake so I thought I would share. I was working on a project and while using iron-on-interfacing I did not cover it with the paper completely. Needless to say I had a big mess and one sticky iron plate. So what do I do when I have a problem like this, right google it. I read that you can purchase and expensive iron plate cleaner or you can just iron dryer sheets.

I put an old towel under the dryer sheet, set the iron on to a pretty hot setting, and started ironing. It did take a a few sheets but it is now as good as new. Quick tip that I am sure I may need again in the future.

Wednesday, November 11, 2009

the thankful tree


We came up with this a few years ago for the Thanksgiving season. We call it the Thankful Tree. I placed a twig from outside (we found a lilac bush to have the best little branches) in a small pot and then filled it with Plaster of Paris. You can find this at any craft store. After this dries place a little bit of moss on top around the twig.
I then cut out some varies colors of small paper leaves , hole punched the top, and threaded a piece to hemp (or string) through.


I then attached this little poem that we had written. You can then write things (or draw pictures) on the leaves and hang them on the tree. This a fun to do throughout the month or on Thanksgiving day. These also make fun little gifts.


I also think that it would be fun doing a similar thing with bigger paper leaves and hang your "Thankful Leaves" on a piece of twine or ribbon. Something like this at Pottery Barn.

Monday, November 9, 2009

password keeper

Do you have a hard time remembering passwords and login names for all of the shopping, bills, registrations, emails, etc. I know that this was becoming a problem at our house. We started writing them on a paper by the computer but were running out of room quickly. We found that an address book worked great for this. I found this one at a dollar store. You just jot down your login and password under the alphabetical letter that is applies to. A is for Amazon, B is for Barnes and Noble, C is for Chase and so on. I hope this helps with the missing passwords at your house.

Tuesday, November 3, 2009

make a monster friend

A little late than never right. Sorry for the gap in posts. We were having a few technical difficulties and we were also busy Halloweening.
My girls have loved these so much that I thought I would post this anyway. I have seen something similar here at Family Fun.


First I had each child choose scraps of fabric they wanted. You will need two body shapes (whatever you would like). It might be fun to have your child draw a shape and use that. I just cut out a shape. Next you will need two legs, two arms, a pocket on the back (optional), and face materials (buttons, ribbon, beads, felt, etc.)


With the legs and arms already stuffed place all of the parts on the inside and sew around the body shape.


Leave a hole to turn it right side out and then stuff the body and sew up the hole. The most fun for my little one was creating it. They loved to design their own monster.
An after thought I had was to cut out a little felt heart and place that inside while stuffing the body (something similar the Build-A-Bear).

***These little monsters became very helpful at our house because they are not afraid of the dark and will help you at night if you get scared.

Monday, October 19, 2009

love helps us grow


I have the opportunity to work with a group of fun little three year-olds. We had a lesson about how our bodies grow and stay healthy through rest, good food, and exercise. As I began, I asked, "What helps us to grow bigger?" One little one raised her little hand and very excitedly answered, "My mommy and daddy love me so much I just keep growing bigger." Many others started to add in also. I smiled to myself because that was a very true answer.
The love from our family does help us to grow.

Thursday, October 15, 2009

outfit organization


Having several daughters in our family can sometimes mean a little extra stress in the morning when it comes to getting dressed for school. Several years ago I found a tip that help simplify this problem for everyone and it has worked fabulously ever since.

We created 8-10 special hangers for everyone by tying ribbon to the top and we used a different color ribbon for each child. This was especially important for those who share a closet.


When it is time to put laundry away, I help each child pick out enough clothes for the next school week. We match up tops and bottoms into outfits including belts, tights, etc. and hang them on the special hangers. We have fun with fashion design and we choose clothes that will work well for the upcoming weather. Creating 7-10 outfits ensures that they will always have a few to choose from and extras if needed.

Each morning for the next week my kids get to choose whatever they are in the mood to wear from the special hangers. Even better I get more free time in the morning and less discussions about wearing pajamas, tutus or shorts with snow boots to school.

Wednesday, October 14, 2009

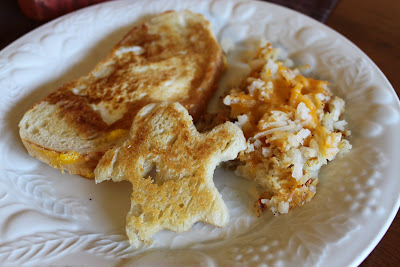
ghosts and bats for breakfast???

Fun Fall Breakfast

Get out all of your favorite cookie cutters (one of our favorite kitchen accessories). Everyone choose their favorite shape. Butter both sides of a slice of bread and cut out your shape from the middle.


Then place your bread on a griddle or frying pan and crack an egg in the middle. Add salt and pepper if desired. Cook until your egg is done. I flip mine and cook on both sides because I like a well done egg.


Enjoy your simple fall breakfast (or lunch or dinner, which we also do a lot around our house.)
We ended up with a ghost, a bat, a foot, and Winnie the Pooh. My little one laughed all morning about eating a foot for breakfast.

Monday, October 12, 2009

fabric pumpkins

A while ago I purchased a box of scrap material from a local furniture factory. I am not sure if all factories do this but if there is one in your area you might want to check into it. It was very inexpensive for a very large box. Anyway the fabric has been great for costumes, throw pillows, i spy pillows, and many other projects including these fabric pumpkins from The Idea Room.


I changed the size a little on mine to adjust to the scraps of fabric that I had.
I love these because thay were easy, fast, and friendly for little hands (non-breakable).

Tuesday, October 6, 2009

stuffed cheesy breadsticks

Stuffed Cheesy Breadsticks
2 1/4 cups warm water
2 Tbs sugar
1 Tb yeast
1 Tb salt
2 Tbs oil
About 6 cups of flour
6-8 String Cheese Sticks
Garlic Butter
400 degrees for about 15 mins
16-18 Breadsticks


I made these with my favorite french bread recipe.

2 1/4 cups warm water
2 Tbs sugar
1 Tb yeast
1 Tb salt
2 Tbs oil
About 6 cups of flour

In mixer or bowl combine warm water and sugar and yeast. After this has softened (a couple of minutes) add oil, salt, and begin adding flour 1 cup at a time. Add until a soft dough if formed. Let this rise for about 10 min and then mix and then let rise again. Repeat this about 3 times.

Turn dough onto a floured surface and divide into 16-18 pieces.


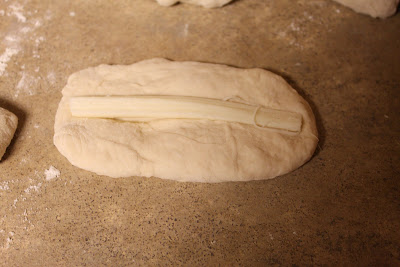
I use string cheese sticks to stuff mine. I split my cheese into three pieces but you could also do two. Flatten out a piece of bread and place cheese on top.

Wrap your bread dough around the cheese. Seal it well or all of your cheese will leak out.


Preheat oven to 400 degrees. Place them on a greased cookie sheet and let rise for about 15 minutes.

Bake for about 15 minutes. Brush with garlic butter while warm.
YUMMY!!


Monday, September 28, 2009

dollar store leaves

If you are looking for a easy and inexpensive way to bring fall into your home (who isn't), here it is. I found this pack of leaves at Dollar Tree dollar store. (Sorry I forgot to take a picture of the package. I was so excited I just ripped into them.) I had enough to use them in these three ways. I added them to some pumpkins (also from the dollar store) and some grapevine balls in a basket.


Add them to a mantle of top of a entertainment center.


Use them as table confetti.

You could also use these of a wreath. For $1.00 this was a great investment!
(I also found a glitter version of these at Walmart later for about the same price.)

Friday, September 25, 2009

cinnamon carmel corn with white chocolate

It is FALL!! Popcorn is a favorite snack/treat at our house. Here is a recipe for Cinnamon Carmel Corn with White Chocolate and Reese's Pieces. I have made this several times just in the last few weeks. It is easy and it will fill your home with a very yummy fall smell. This is our variation of a recipe I found at Our Best Bites. We love that you can use honey or Karo Syrup. If you have a food allergy(which tends to run in our family) or trying to cut back on high fructose corn syrup , honey works great.

12 C popped popcorn (about 1/2 C kernels)
1 C brown sugar
3/4 t cinnamon
1/4 C honey (you could also use Karo Syrup)
1 stick real butter (1/2 C)
1/2 tsp. baking soda
1 tsp. vanilla
3 squares almond bark
1 Cup of Reese's Pieces

Preheat oven to 250 degrees

Place popcorn a side in 1 or 2 large bowls. Mix brown sugar and cinnamon until it is mixed well in a microwave safe bowl. Chop the butter into chunks and place on top of the sugar mixture. Pour honey (or Karo Syrup) on top.


Microwave for about 30 sec. and then stir. As I found out on the first batch(burned black and stinky), everyone's microwave will be different.


Keep stirring and then cooking it for about 30sec - 1min at a time until it looks nice and bubbly like this. Then add the vanilla and baking soda. This will make it a little foamy.


Pour it over your popcorn and stir to coat . I placed mine onto two lined cookie sheets. It will be gooey now but it will harden as you cook it. Place it in the 250 degree oven and cook for about 30 min (switching the bottom pan to the top and stirring after 15 min). Test it to see if it is crunchy enough. While it is cooling melt your white chocolate or almond bark (I just microwaved mine).

The best part.....add the Reese's Pieces and then drizzle the white chocolate over the pan. Let is set up (hardest part... waiting) and then enjoy.

Yummy looking, yummy smelling, and yummy tasting!!

Tuesday, September 22, 2009

fun fall projects

FALL MONOGRAM WREATH


I love fall. It is the time of year I finally feel like baking after a hot summer and I love to make our home cozy for the coming cold. I found this fun wreath and I loved it so here is what our turned out like. I had a grape vine wreath and some orange berries already in my fall decor box so I just wired these together. I found a fall floral bush and just sniped it into individual pieces and stuck it into the wreath. I didn't glue anything because I then can take it apart and use it for other seasons. I found my "S" at Michaels for $1.99 and I painted it white and then sanded the edges and rubbed some stain over it. I didn't have any wide ribbon on hand to hang it with so I used a strip of fabric. I learned how to hang it over at the Nesting Place.
I usually have some kind of wreath on our door and thought this was a fun and different look. It was very easy and I loved out it turned out.


RUSTIC WOOD PUMPKINS


These cute wood pumpkins are made from a landscape timber. It was cut into 4, 5, and 6 inch lengths. These timbers are usually tinted a cherry color but I sanded these to make them smoother and then painted them orange. Going over them one more time with the sandpaper gives them an antiqued look. A hole drilled in the top allows space for a small piece of a branch to make the stem. Then they are finished off with a fun green ribbon or piece of fabric for the leaves. This simple project makes a great centerpiece or mantle decor for this fun fall season.


REVERSIBLE FALL BLOCKS


These cute fall blocks do double duty. They spell out fall on one side and boo on the other. They are made from a 2x4 cut into 5 inch lengths. They are actually 3X5 when finished. A coat of black paint, some scrapbook paper, and vinyl letters finish off the project. Easy and simple but so fun.
Related Posts with Thumbnails